Emergency Stops
Before proceeding any further please familiarize yourself with the emergency stops throughout the facility and on the TCS. There are two hardware emergency stops: one located on the control room mimic panel and another on the control panel on the dome floor. These buttons will stop ALL telescope and dome movements including the dome shutters and tracking (slow motion drive). Control can only be re-enabled once the emergency stop button has been released by twisting it out of its pressed in position. During an emergency stop the telescope control software (TCS) will display an emergency message. Feel free to test the emergency stop buttons.
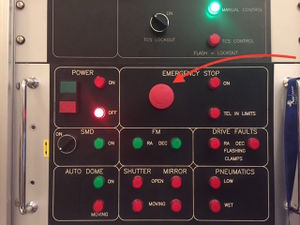
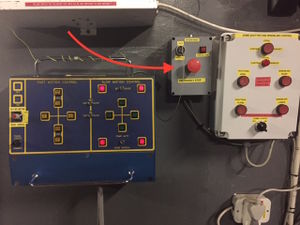
The TCS also has a "STOP Tel.+Dome" button that will stop all telescope and dome movements including the dome shutters and tracking (slow motion drive). This is not so much an "emergency" button as control is still possible, but can be used to stop all motions. This button will only work if the TCS has control.
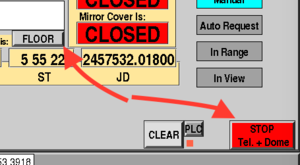 Fig. Stop telescope and dome motions with control not on TCS (floor). Button will not work.
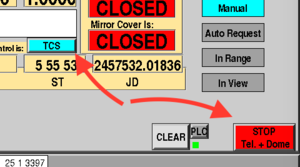 Fig. Stop telescope and dome motions with TCS control. Button will work.
Introduction
As of 23 May 2016, the TCS allows full control of the telescope, acquisition camera and dome from the control room. This includes everything from power control to full slewing to target. "Manual" control of the telescope is still possible. This wiki is a basic guide to operating the 74inch from arriving at the telescope to closing down at the end of the night.
Every attempt has been made to ensure the 74inch operates within safe limits. However, given the age of the telescope, it was not designed to be operated under computer control. Always be vigilant of the ongoing status of the telescope and dome e.g.:
- when slewing the telescope, open the control room door and verify that the telescope is moving as you expect.
- when tracking targets far into the west, do not rely on telescope and/or software limits to stop the telescope but stop the telescope with time to spare
- If you are not observing (e.g. waiting for target) then make sure the slow motion drive "tracking" is switched off.
- keep a constant eye on the weather at all times. Weather "Observing Limits" are on display in the control room. Besides going outside to check conditions, online local weather information can be monitored here:
http://suthweather.saao.ac.za/
http://www.saao.ac.za/~sbp/suthweather_predict.html
Ideally the TCS software should be running all the time. Do not shut it down. If it is not running then press the  icon to execute. Two additional programs are also on the TCS computer which run in concert with the TCS:
The following sections describe recipes for operating the telescope. Recipes for "manual" or "TCS" control of the telescope are given.
Start-up Recipe
1. Switch ON lighting circuits at entrance to dome.
2. Switch OFF all downstairs & observing floor lights (having trouble finding the switches?)
3. Check weather on the Sutherland weather website -- only proceed if windspeed < 60 km/h; humidity <90%; T_external - T_dewpoint > 1.5.
4. Check Telescope Power Control is set to PLC at top of stairs (should be the default).
5. Ensure that the TCS software is running.
6. On the mimic panel in the control room:
- Switch "TCS LOCKOUT" to the OFF position. First check that no one is working in the dome.
- Switch the SMD to the OFF position.
7. On the floor control panel ensure that:
- RA and Dec control are in the SLOW positions (should be the default).
- Dome is on AUTO (should be the default).
- Dome lights switch is in the OFF position. (should be the default).
8. Turn on Telescope Power:
- TCS: take TCS control (press FLOOR/TCS button) and turn on power (press "Telescope Power"). Button should go from red to green.
- Manual: Press and hold the green button for 3 sec. under "Power" on the control mimic panel in the control room.
Note: it takes 1-2 minutes for complete power up.
9. Open dome shutters:
- TCS: Press DOME for drop down menu and select "Shutter open"
- Manual On the dome control panel, press "local" to get control and then press "SHUTTERS OPEN"
10. Open mirror covers:
- TCS: Press DOME for drop down menu and select "Mirror open"
- Manual On the dome control panel, press "local" to get control. Use the ladder to press the "OPEN" on the north side of the telescope.
11. Lower windblind
- TCS: Press DOME for drop down menu and select "Blind lower"
- Manual On the dome control panel, press "local" to get control and then press "WINDBLIND LOWER"
12. Initialise XY-slides (TCS).
TCS Shutdown checklist
* NOTE: in unexpected bad weather, perform step 5 first, then 6, then 1 onwards.
From the TCS
1. Stop instrument and autoguider exposures.
2. Initialise XY-slides (TCS)
3. Switch OFF the slow motion drive/tracking: Button should go from green to red.
4. Park telescope: Under "TARGET" select "PARK". This will park telescope at HA = ~0h, Dec = -32º and automatically switch off tracking (SMD).
5. Switch dome to manual: select Auto/Man to toggle to Man. The button should turn red.
5. Close mirror covers: Under "DOME" select "Mirror CLOSE"
6. Close dome shutters: Under "DOME" select "Shutter CLOSE"
7. Lower windblind: (if appropriate): Under "DOME" select "Blind LOWER"
8. Switch OFF telescope power: Button should go from green to red.
Before leaving the telescope:
Dome floor control panel:
- If windspeed > 50km/h, rotate dome 180º from wind direction before closing. Do this manually from the dome floor control panel.
- Dome switch is set to manual
- Ensure RA and Dec are left in the SLOW motion.
- Dome lights switch is in the OFF position.
Control room mimic control panel:
- SMD is in the OFF position
- TCS lockout in ON
9. Switch OFF lighting circuits at exit.
10. End of run: copy data; report faults; complete feedback form, put Sutherland Observing Record in tray in warm room; for SpUpNIC or GIRAFFE, tear out 1st and 2nd copy of each completed page in triplicate log book -- keep 1st copy and put 2nd copy in end of run tray.
Manual Shutdown checklist
* NOTE: in unexpected bad weather, perform step 7 first, then 8, then 1 onwards.
From the control room:
1. Stop instrument and autoguider exposures.
2. Initialise XY-slides (TCS)
3. Switch OFF the slow motion drive/tracking SMD on the mimic control panel in the control room
From the dome floor control panel
4. Select "LOCAL" on the control panel.
6. Park telescope at HA = 0h, Dec = -32º, leave in SLOW mode. With dome in "AUTO" it will move to the park position ~to 90º (East) azimuth.
7. Switch dome rotation to Manual. Rotate dome to 90º azimuth (to keep rain off telescope). If windspeed > 60km/h, rotate dome 180º from wind direction before closing.
8. Close mirror covers. Use ladder to each "CLOSE" button on mirror cover control panel (north side of telescope)
9. Close dome shutters. From the dome floor control panel select "SHUTTERS CLOSE"
10. Lower windblind (if appropriate). From the dome floor control panel select "WINDBLIND LOWER"
From the control room:
11. Switch OFF telescope power (push and hold for 3 sec) "Power" button on mimic control panel "Telescope Power" button.
Before leaving the telescope:
Dome floor control panel:
- If windspeed > 50km/h, rotate dome 180º from wind direction before closing. Do this manually from the dome floor control panel.
- Dome switch is set to manual
- Ensure RA and Dec are left in the SLOW motion.
- Dome lights switch is in the OFF position.
Control room mimic control panel:
- SMD is in the OFF position
- TCS lockout in ON
12. Switch OFF lighting circuits at exit.
13. End of run: copy data; report faults; complete feedback form, put Sutherland Observing Record in tray in warm room; for SpUpNIC or GIRAFFE, tear out 1st and 2nd copy of each completed page in triplicate log book -- keep 1st copy and put 2nd copy in end of run tray.
TCS Recipe for Acquiring a Target
1. Check that COORDINATE EQUINOX is set to that of your target coordinates (otherwise, type it under "SET EQUINOX" and press ENTER on the keyboard).
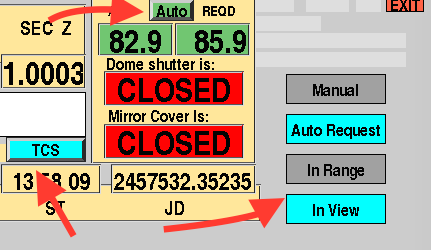
2. Click TARGET and input the RA & DEC (hh mm ss dd mm ss). Select Auto for automatic slewing. The TCS will perform several tests before accepting your target request and slewing the telescope:
- Dome must be in Auto mode.
- Telescope must be under TCS control.
- The target must be in view
If all OK:
- the Manual indicator will turn from cyan to grey
- the Auto request indicator will turn from grey to cyan
- the In View indicator will turn from grey to cyan
- if the target is already nearby (<~10 arcminutes) the In Range indicator will turn from grey to cyan and the telescope will move in slow motion only
- the telescope will slew to the target in fast motion until "In Range" where it will switch to slow motion
- once target field has been acquired the Auto Request will turn back to grey and the Manual will turn to cyan.
Make sure there are no outstanding "Auto Requests" by pressing the Manual button if necessary. This is to avoid any unexpected auto requests moving the telescope at a later stage.
You can cancel the Auto Request at any time by pressing the Manual button or even the STOP Tel.+Dome button. The STOP Tel.+Dome button will put the telescope in a safe mode
3. Identify the target
InExposures & Guiding:
- Move GUIDE MIRROR IN BEAM by clicking on that box.
- Click Expose and select exposure time from drop-down menu to start images.
- Hint for good scaling in the display: keep the bottom slider all the way to the left and move the top slider towards the left until the stars appear. Then adjust the vertical slider. Dragging downwards generally reduces background and increases contrast.
- Identify the target in the image display by comparing to a finder chart and making fine adjustments in RA & Dec using the handset or the TCS GUI handset.
- Place the target at the location on the image display corresponding to the desired position on the science instrument.
- Ensure that XY slides have been initialized. (Click "Initialize" under XY slides control). This should have been done before acquiring target.
Note the next steps are generalizations. Details may vary depending on the instrument being used.
4. Move GUIDE MIRROR OUT OF BEAM to direct the beam to the science detector.
5. Check the position of the target in the instrument and adjust RA & Dec as necessary using the handset.
6. Adjust telescope focus using the TCS Menu1, Focus box (enter value) or the Focus In and Out buttons on the warm room paddle. Approximate focus values are given for each instrument.
- Once focus is achieved for the instrument, the guider camera may need to be refocussed. Under the "Camera Focus" box at lower right, click on the up/down arrows to start focus changing. Press stop to stop the change.
7. Once the star is well positioned on the science detector, select a guide star.
- Enter coordinates of the target field in the guide star software and click GET IMAGE. A window should appear with a 10x10 arcmin DSS map. In order to save time, this step could have been done earlier whilst telescope was slewing.
- Click on a brightish star outside of the green circle in the DSS image.
- NOTE: this chart is centered on the coordinates. If you have substantially adjusted the position of the target to be away from the center of the acquisition frame, there will be the same offset in whatever guide star is selected.
- Under XY Slides Control, click GoTo GS. The star should appear in the acquisition image. If not, try a different star.
- Under Pointer click Guide Star, then click on the chosen guide star in the acquisition camera FOV. This will put a dark blue box (guide point) centered of the star.
- Press GUIDE on the Exposures & Guiding box to start guiding.
- NOTE: if the star is near a hot pixel, that could cause trouble with guiding. Click Move XY and click on the star: this will center it (just moving the XY stages, and not effecting the science target).
- To stop or restart guiding (e.g. after brief intervals of cloud), press GUIDE.
- To change exposure times, select exposure time from the drop down menu under Expose. Exposure times between ~1-6 seconds is good for guiding.
Recipe for Manually Acquiring a Target
1. Check that COORDINATE EQUINOX is set to that of your target coordinates (otherwise, type it under "SET EQUINOX" and press ENTER on the keyboard).
2. Click TARGET and input the RA & DEC. Select "Manual". The target RA and Dec will also be displayed on the TCS monitor on the dome floor. Acquire target by slewing the telescope from the dome floor control panel.
- Warning in manual mode the TCS software does not check if your target is in view. Software limits are overridden. Be absolutely sure you know what you are doing.
3. In Exposures & Guiding:
- Move GUIDE MIRROR IN BEAM by clicking on that box.
- Click Expose and select exposure time from drop-down menu to start images.
- Under “Image Options” select the preferred LUT and SCALE.
- Hint for good scaling in the display: keep the bottom slider all the way to the left and move the top slider towards the left until the stars appear. Then adjust the vertical slider.
4. Identify the target star in the image display by comparing to a finder chart and making find adjustments in RA & Dec using the handset.
5. If known, place the target at the location on the image display corresponding to the desired position on the science CCD.
6. Move GUIDE MIRROR OUT OF BEAM to direct the beam to the science detector.
7. Check the position of the target in the instrument and adjust RA & Dec as necessary using the handset.
8. Adjust focus, using the TCS Menu1, Focus box (enter value) or the Focus In and Out buttons on the warm room paddle. Approximate focus values are given for each instrument.
- Once focus is achieved for the instrument, the guider camera may need to be refocussed. Under the "Camera Focus" box at lower right, click on the up/down arrows to start focus changing. Press stop to stop the change.
9. Once the star is well positioned on the science detector, select a guide star.
- Ensure that XY slides have been initialized. (Click "Initialize" under XY slides control).
- Open the guide star software (the icon of a star with a long tail).
- Enter coordinates of the field and click "GET IMAGE". A window should appear with a 10x10 arcmin DSS map.
- Click on a bright star outside of the green circle in the DSS image.
- NOTE: this chart is centered on the coordinates. If you have adjusted the position of the target to be away from the center of the acquisition frame, there will be the same offset in whatever guide star is selected.
- Under "XY Slides Control," click "GoTo GS". The star should appear in the acquisition image. If not, try a different star.
- Under “Pointer" click "Guide Star" , then click on the chosen guide star in the acquisition camera FOV. This will put a blue box around the star and begin guiding.
- NOTE: if the star is near a hot pixel, that could cause trouble with guiding. Click "Move XY" and click on the star: this will center it (just moving the XY stages, and not effecting the science target).
- To stop or restart guiding (e.g. after brief intervals of cloud), press GUIDE.
- To change exposure times, press STOP, select exposure time from the drop down menu under Expose.
Instrument Focus Settings
Approximate focus values for each of the instruments are listed here. Make further adjustments on target.
  GIRAFFE: ~2090
  HIPPO: ~2120
  SHOC"  ~1900 (~1940 with focal reducer; guide camera ~ 680)
  SpUpNIC:   ~2200
  STE3/4: ~2090 (~ 2120 with focal reducer)
Telescope
Telescope power control
The original telescope isolator switch at the top of the stairs has been replaced by a three position switch (see figure below) that should be in the "PLC" position and left that way for normal operations, day and night. Observers should not use this switch unless authorised to do so by a technician. If the switch is not found in the "PLC" position, contact the electronics technician for guidance. Telescope power is now switched on/off at a new multifunctional control panel in the warm room, described in the following section.
- Example.jpg
The new power switch at the top of the stairs. Ordinarily, it should be in the "PLC" position, day and night. Observers should not use this switch unless authorised by a technician.
Warm room control panel
In April 2013, a new panel was installed in the warm room to control power to the telescope, slow motion drive and automatic dome rotation, and to indicate the status of a number of telescope subsystems (see figure below). Its functionality is described below.
- Example.jpg
The new control panel installed in the warm room in April 2013. Power to the slow motion drive is controlled by turning the switch in the "SMD" section. When the drive power is on, the green light illuminates.
Telescope power
Large green "On" and "Off" buttons are located in the top left section of the panel, with corresponding indicators that illuminate to show the current status. To operate, push and hold in for $\sim 3$ seconds. These buttons replace the power switch previously located at the top of the stairs.
There is a safety interlock preventing telescope power from being switched off unless:
- Dome shutter is CLOSED (both "SHUTTER" indicators are off)
- Mirror shutter is CLOSED (both "MIRROR" indicators are off)
- RA and Dec are set to SLOW (both "FM" indicators are off)
The power OFF indicator will flash if an attempt is made to power down the telescope while the above subsystems are not in a safe state.
Dome Information
Light switches
As you enter the 1.9m building, on the wall to your right are four switches. The two close together (labelled "Light Switch Main L.T. board" and "Light Switch D.B.5") should be switched on -- these give you mains power (switching them off kills the lights, but not the power to certain vital components such as PCs). The other two switches give you incandescent and fluorescent lights in the entrance area and should be switched off if you are going to observe/take flats/do focus tests with the spectrograph.
There is a light switch at the bottom and also at the top of the steps -- again, you need the stairwell lights off (and all observing floor lights off) if you are going to do tests on the spectrograph.
There are three other lighting systems on the observing floor which might need to be switched off:
- Dome incandescent lights -- the switch for these is on the dome wall, to the west side of the north pier (just to the right of the ``grating room door).
- Dome fluorescent lights just below catwalk level -- these are switched on/off at the new white switches beside the electrical panel (the metal doors on the south west wall of the dome near the stair railing)
- Dome fluorescent lights high up on the inside of the dome itself -- these can be operated from three different places:
- The control room, using the DOME dropdown menu on the TCS
- The observing floor, using the panel on the North pier. If the switch does not work the first time, press the "Request Control" button at the top of the panel and try again.
- The catwalk, using the button on the orange control cabinet by the dome shutters.
Further information
This wiki is meant to provide information on using the 74" telescope. Outdated information can be found in the 74" TCS user manual, v. 10.2, updated Nov. 2014.
- Report any problems on the fault reports page.
- Give feedback at the end of your observing run: http://www.saao.ac.za/science/observing/feedback/.
- Fill in the Sutherland Observing Record each night (paper copies in the dome).
- For GIRAFFE, SpUpNIC, or STE3/4: please fill in the triplicate Log Book for each exposure.
Call out list
Telescope software issues: standby **113 (0829034869) or 9118
Electronics Issues: standby **103 (0767895131) or 9117
Mechanical Issues: standby **104 (07678951232)
Current known issues
Telescope pointing problems/time server error If you encounter telescope pointing problems, check the time and date displayed on the TCS, as the cause could be the time server. If the date/time is wrong, please call the electronics technician for assistance.
Crash GUI fails to open when clicking icon 1) Exit the crash_limits software if it is running (presumably it is not) 2) Exit the TCS (Obviously do this during a convenient gap in observations, remember to stop acquisition exposures before exiting) 3) open an xterm 4) type "mv live.dat live.temp" 5) restart TCS 6) restart crash_limits software
Webcam
- Download and install Foscam app from here:
- Login to the Foscam app with the following details:
Email: it@saao.ac.za PW: Ask IT
Internet Explorer access only
URL: https://74incam.suth.saao.ac.za
Username: operator
Password: 74incam

