Difference between revisions of "Observation requests for Lesedi+Mookodi"
(→Specifying an observation) |
(→Troubleshooting) |
||
| (123 intermediate revisions by the same user not shown) | |||
| Line 1: | Line 1: | ||
| − | ==Getting started== | + | ==Getting started with the OCS== |
| − | If you have been allocated queue-scheduled time on Lesedi, you will need to submit | + | If you have been allocated queue-scheduled time on Lesedi, you will need to submit your requests to schedule observations via the SAAO Observatory Control System (OCS). Note that '''you need to have accepted the time allocation first''', as instructed in the email informing you that your telescope time application was successful. This is done on the '''[https://www.saao.ac.za/astronomers/accept-a-proposal Accept a Proposal]''' page on the SAAO website, where you will be prompted to log in with your Observer Portal credentials, then click the [https://www.saao.ac.za/astronomers/accept-a-proposal link] again. |
| − | You will | + | You will need to create an account on the OCS by submitting the [https://ocsio.saao.ac.za/accounts/register registration form]. You should then send an email to Ramotholo Sefako informing him of your username, so that he can link your telescope time to your OCS account. |
| − | Once your account has been activated, you can sign in at the [https://ocsio.saao.ac.za/accounts/login OCS login page]. | + | Once your account has been activated, you can sign in at the [https://ocsio.saao.ac.za/accounts/login OCS login page]. It is advisable to go to your "Profile" by clicking on the person icon in the top-right-hand corner once you've logged in, and select your '''notification preferences''' at the bottom of the "Settings" page. If you tick both "Notifications enabled" and "Notifications on authored only", you will receive an email informing you each time a request you have submitted to the queue has been completed. |
| − | To submit an observation to the queue, click “Submit Observation” in the top left of the landing page, which will present you with the form to fill in. The first two | + | To submit an observation to the queue, click “Submit Observation” in the top left of the landing page, which will present you with the form to fill in. The first two components - [[#Populating RequestGroup and Request|RequestGroup and Request]] - are explained for all types of observations in the next section. Beyond that, there are recipes to follow for different types of observations. |
| + | |||
| + | Note that while we use the OCS developed by Las Cumbres Observatory (LCO), '''not all of the options available on the submission form have been implemented'''. If you are familiar with the LCO OCS, you will notice some differences in the functionality here. | ||
<br clear=all> | <br clear=all> | ||
| Line 13: | Line 15: | ||
<br clear=all> | <br clear=all> | ||
| − | == | + | ==Populating RequestGroup and Request== |
===RequestGroup=== | ===RequestGroup=== | ||
| + | The first section of the observation request form should look like the image below. Note that you can toggle between the form, the API view and a list of Drafts using the buttons in the panel along the top. You can save a draft any time using the blue button to the right, then load it from the Drafts tab at the top. In this way you can abandon a partially completed submission and return to complete it later. It is also particularly useful to save a completed form as a draft once you're happy with it, so that you can load it later to use as a template for future observation requests. | ||
| + | |||
| + | <br clear=all> | ||
| + | [[File:OcsRequestGroup.png|600px|left|thumb|]] | ||
| + | <br clear=all> | ||
| + | |||
| + | The options for a RequestGroup are as follows: | ||
| + | |||
| + | *'''Name''': Give your request an identifier that is appropriate for your target/proposal/observation type. This is only for your purposes and need not take a specific format, but you should be able to recognise it in a list of all users’ request groups. | ||
| + | |||
| + | *'''Proposal''': Your proposals that have time allocated to them will be available in the dropdown list. Select the appropriate proposal for your observation. If there is nothing in the list and you have accepted your proposal and registered as instructed above, contact Ramotholo Sefako. | ||
| + | |||
| + | *'''Type''': The options are: | ||
| + | |||
| + | #''Queue scheduled'': this is a “normal” observation that can be made by the queue when it is feasible to do so, when the other parameters of your request are met. | ||
| + | #''Time critical'': if your observation is time sensitive (e.g. a transit, eclipse, etc.), you can specify a window within which it must be executed. Note that your proposal will need to have been approved as time critical, and have time critical hours allocated to it in order for this to work. | ||
| + | #''Rapid response'': this is for observations that need to be triggered as soon as possible, and will interrupt the scheduled queue (but will not interrupt an observation in progress). Again, you will need rapid response hours allocated to your proposal to successfully use this option. | ||
| + | |||
| + | *'''IPP Factor''': Intra/Inter Proposal Priority factor. This will largely be of interest if you would like to prioritise different observations within your proposal; you would give a larger number to a higher priority observation. Values must be between 0.5 and 2. If you’re happy for all your observations to have equal priority, stick with the default value of 1.05. This is a very basic summary, the full explanation of IPP can be found [https://lco.global/documents/20/the_new_priority_factor.pdf here]. | ||
| + | |||
| + | ===Request=== | ||
| + | [[File:OcsRequest.png|600px|left|thumb|]] | ||
| + | <br clear=all> | ||
| + | |||
| + | *'''Acceptability Threshold''': Here you would specify the percentage of the request that would need to be done in order for you to accept it as having been completed. E.g. if you requested 10 exposures and only nine were taken, the default of 90% would accept this as complete. Had you specified 100%, the observation would be rescheduled. The time taken for the incomplete observation would be deducted from your allocation, as would any repeat observation that makes it to completion, so it'd be wise to avoid demanding 100% for completion unless you really need it. | ||
| + | |||
| + | *'''Configuration Repeats''': This should be 1. (If you set it >1, it will still only schedule one iteration of the configuration.) | ||
| + | |||
| + | *'''Optimization Type''': The options are: | ||
| + | #''Time'': favours scheduling the observation earlier in the observing window. Use this option as the default, especially as you can apply an airmass constraint in a later section. Definitely select this for time-critical observations. | ||
| + | #''Airmass'': will aim to observe the target at lower airmass. Note that specifying this results in a slightly lower chance of the request being observed if the queue is full. | ||
| + | |||
| + | *'''Mosaic''': This has not been commissioned with Lesedi+Mookodi, so should be left as ''None''. | ||
| + | |||
| + | ==Recipe 1: Imaging with a single filter== | ||
| + | |||
| + | This recipe describes the Configuration and Instrument Configuration options for Mookodi's imaging mode -- follow this if you intend to do photometry using only one filter. | ||
| + | |||
| + | ===Configuration: single filter imaging=== | ||
| + | [[File:OcsImageConfig.png|600px|left|thumb|]] | ||
| + | <br clear=all> | ||
| + | *'''Instrument Category''': IMAGE | ||
| + | *'''Instrument''': 1M0a_Mookodi-Img | ||
| + | *'''Guide Mode''': For single short exposures (~60s) guiding isn’t necessary (Off), but for longer exposures, or multiple short exposures, it is advisable to use the autoguider (On). The "optional" tick box is not implemented so you can ignore it. | ||
| + | *'''Type''': Choose ''Expose'' here. Other applicable options are Bias and Sky_flat, but these are taken automatically on a regular basis, so you will have access to them without observing them as part of your proposal. | ||
| + | *'''Acquire Mode''': The options are as follows, where AcN stands for "acquire nearest star" and "Acq" means to "acquire RA & Dec": | ||
| + | #''AcN:OFF&Acq:OFF'': this option simply points the telescope and starts the observation without making any pointing adjustments. In other words, you are reliant on the telescope's pointing accuracy. | ||
| + | #''AcN:OFF&Acq:ON'': this option will centre the requested coordinates on the centre of the CCD. This is a good default option, but should definitely be used if (i) you have entered the coordinates of a space between stars, e.g. to fit both an target and a comparison star in the field; (ii) the field is crowded; and (iii) the target wouldn't be visible in a four second acquisition image. | ||
| + | #''AcN:ON&Acq:ON'': this option first centres the specified coordinates on the centre of the CCD, then adjusts the pointing to recentre on the brightest star found within a 3 arcsec search area around that position. This is useful for transients which may not have such accurate coordinates. | ||
| + | *'''Dither''': Select ''None'' as this is not commissioned on Lesedi+Mookodi. | ||
| + | |||
| + | ===Instrument Configuration: single filter imaging=== | ||
| + | |||
| + | For a single filter, you will only need one instrument configuration. | ||
| + | |||
| + | [[File:OcsImageInstConfig1.png|600px|left|thumb|]] | ||
| + | <br clear=all> | ||
| + | |||
| + | *'''Exposure Count''': Enter the number of consecutive images to take with this instrument configuration and the specified Exposure Time. | ||
| + | *'''Readout Mode''': The options are 1x1HighFastOpen, 1x1HighFastAuto, 1x1HighSlowAuto, 2x2HighFastAuto with the format Binning_Gain_Readout_Shutter and the following definitions: | ||
| + | #''Binning'': 1x1 (platescale 0.59 arcsec/pix) or 2x2 (1.18 arcsec/pix) | ||
| + | #''Gain'': High (for faint targets) or Low (bright targets) | ||
| + | #''Readout rate'': Fast (5 MHz - read noise 13.6 electrons) or Slow (0.05 MHz read noise 3.3 electrons) | ||
| + | #''Shutter'': Open must be selected for multiple exposures <60 seconds (time series will therefore typically be 1x1HighFastOpen). Otherwise Auto for longer exposures. | ||
| + | *'''Filter''': Mookodi has [https://topswiki.saao.ac.za/index.php/Mookodi#Specifications two filter magazines], which the OCS calls Filter and Obfilter (below). There needs to be one filter – and only one filter – in the beam at any time, so you need to select one from one of the two magazines. In this box you can select an SDSS filter. If you want to use a clear filter, it is in the next field, so select OUT here. | ||
| + | *'''Obfilter''': If you have selected an SDSS filter in the Filter option, select OUT here. Otherwise select Clear. Do not select OrdBlk_Fltr - this is for spectroscopy. | ||
| + | *'''Slit''': must be OUT. | ||
| + | *'''Grism''': must be OUT. | ||
| + | *'''Offset RA/Dec''': this is not implemented so should be left blank. | ||
| + | |||
| + | ==Recipe 2: Imaging - multiple filter cycling== | ||
| + | |||
| + | If you would like to cycle repeatedly through multiple filters, you can do that by specifying multiple Instrument Configurations (one per filter) and selecting the REPEAT_EXPOSE optio, as described below. | ||
| + | |||
| + | ===Configuration: multiple filter cycling=== | ||
| + | [[File:OcsImageConfig2.png|600px|left|thumb|]] | ||
| + | <br clear=all> | ||
| + | *'''Instrument Category''': IMAGE | ||
| + | *'''Instrument''': 1M0a_Mookodi-Img | ||
| + | *'''Guide Mode''': For single short exposures (~60s) guiding isn’t necessary (Off), but for longer exposures, or multiple short exposures, it is advisable to use the autoguider (On). The "optional" tick box is not implemented so you can ignore it. | ||
| + | *'''Type''': Choose ''REPEAT_EXPOSE'' and a box will appear requesting a duration. In this example, your instrument configurations (filters) will be repeated in turn for two hours. (Do not use ''REPEAT_EXPOSE'' to take multiple images in only one filter as it will add a short delay between exposures - for single filter runs rather specify the number of images in Instrument Configuration Exposure Count.) | ||
| + | Other applicable options are ''Bias'' and ''Sky_flat'', but these are taken automatically on a regular basis, so you will have access to them without observing them as part of your proposal. | ||
| + | *'''Acquire Mode''': The options are as follows, where AcN stands for "acquire nearest star" and "Acq" means to "acquire RA & Dec": | ||
| + | #''AcN:OFF&Acq:OFF'': this option simply points the telescope and starts the observation without making any pointing adjustments. In other words, you are reliant on the telescope's pointing accuracy. | ||
| + | #''AcN:OFF&Acq:ON'': this option will centre the requested coordinates on the centre of the CCD. This is a good default option, but should definitely be used if (i) you have entered the coordinates of a space between stars, e.g. to fit both an target and a comparison star in the field; (ii) the field is crowded; and (iii) the target wouldn't be visible in a four second acquisition image. | ||
| + | #''AcN:ON&Acq:ON'': this option first centres the specified coordinates on the centre of the CCD, then adjusts the pointing to recentre on the brightest star found within a 3 arcsec search area around that position. This is useful for transients which may not have such accurate coordinates. | ||
| + | *'''Dither''': Select ''None'' as this is not commissioned on Lesedi+Mookodi. | ||
| + | |||
| + | ===Instrument Configuration: multiple filter cycling=== | ||
| + | |||
| + | For a multiple filters, you will need one instrument configuration per required filter, then use the REPEAT_EXPOSE function to cycle through those filters in turn. | ||
| + | |||
| + | [[File:OcsImageInstConfig2.png|600px|left|thumb|]] | ||
| + | <br clear=all> | ||
| + | |||
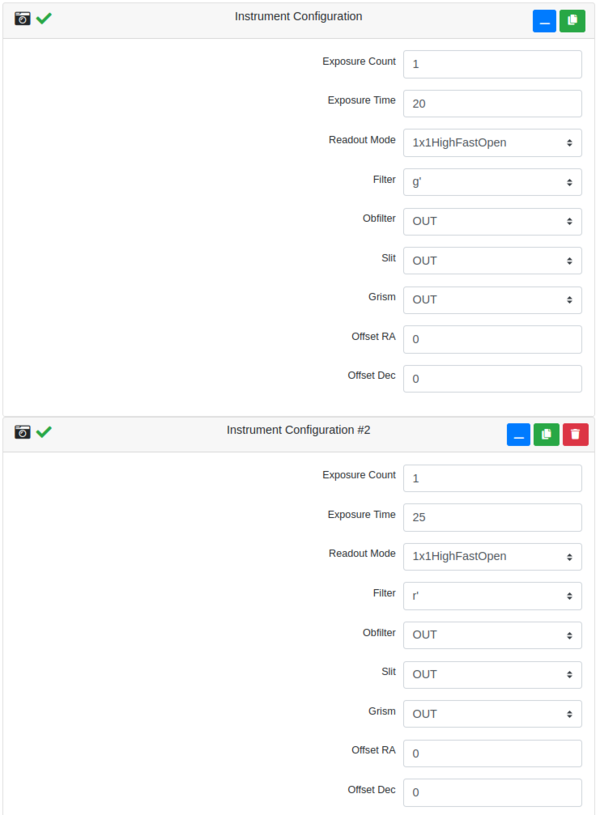
| + | *'''Exposure Count''': Enter 1 here to take one exposure in each filter before moving on to the next filter. | ||
| + | *'''Readout Mode''': The options are 1x1HighFastOpen, 1x1HighFastAuto, 1x1HighSlowAuto, 2x2HighFastAuto with the format Binning_Gain_Readout_Shutter and the following definitions: | ||
| + | #''Binning'': 1x1 (platescale 0.59 arcsec/pix) or 2x2 (1.18 arcsec/pix) | ||
| + | #''Gain'': High (for faint targets) or Low (bright targets) | ||
| + | #''Readout rate'': Fast (5 MHz - read noise 13.6 electrons) or Slow (0.05 MHz read noise 3.3 electrons) | ||
| + | #''Shutter'': Open must be selected for multiple exposures <60 seconds (time series will therefore typically be 1x1HighFastOpen). Otherwise Auto for longer exposures. | ||
| + | *'''Filter''': Mookodi has two filter magazines, which the OCS calls Filter and Obfilter (below). There needs to be one filter – and only one filter – in the beam at any time, so you need to select one from one of the two magazines. In this box you can select an SDSS filter. If you want to use a clear filter, it is in the next field, so select OUT here. | ||
| + | *'''Obfilter''': If you have selected an SDSS filter in the Filter option, select OUT here. Otherwise select Clear. Do not select OrdBlk_Fltr - this is for spectroscopy. | ||
| + | *'''Slit''': must be OUT. | ||
| + | *'''Grism''': must be OUT. | ||
| + | *'''Offset RA/Dec''': this is not implemented so should be left blank. | ||
| + | |||
| + | Assuming the only change you wish to make between exposures is the filter, it's easiest to complete one Instrument Configuration, then click on the green "copy" icon in the section title bar to add another pre-populated Instrument Configuration for as many filters as you need, then edit the Filter or Obfilter field as appropriate. This example will continuously cycle 20s in g', then 25s in r' for 7200s. | ||
| + | |||
| + | ==Recipe 3: Spectroscopy== | ||
| + | |||
| + | Being an imaging spectrograph, Mookodi has two different Configurations in the OCS. Instrument Category ''SPECTRA'' makes specific spectroscopic functions available. | ||
| + | |||
| + | ===Configuration: spectroscopy=== | ||
| + | [[File:OcsSpecConfig.png|600px|left|thumb|]] | ||
| + | <br clear=all> | ||
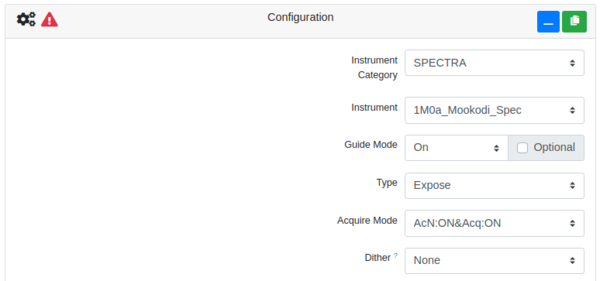
| + | *'''Instrument Category''': SPECTRA | ||
| + | *'''Instrument''': 1M0a_Mookodi_Spec | ||
| + | *'''Guide Mode''': Always select ''On'' for spectroscopy to prevent the target from drifting off the slit. | ||
| + | *'''Type''': Choose ''Expose'' here. An arc lamp spectrum is automatically taken after each science spectrum, so there’s no need to make a configuration using ''Arc_lamp''. Other applicable options are ''Bias'', ''Sky_flat'' and ''Standard'', but these are taken automatically on a regular basis, so you will have access to them without observing them as part of your proposal. | ||
| + | *'''Acquire Mode''': The options are as follows, where AcN stands for "acquire nearest star" and "Acq" means to "acquire RA & Dec": | ||
| + | #''AcN:OFF&Acq:OFF'': do not use this for spectroscopy, the target will not land on the slit. | ||
| + | #''AcN:OFF&Acq:ON'': this option will centre the requested coordinates on the centre of the CCD. This should be used if the field is crowded and/or the target wouldn't be visible in a four second acquisition image. | ||
| + | #''AcN:ON&Acq:ON'': this option first centres the specified coordinates on the centre of the CCD, then adjusts the pointing to recentre on the brightest star found within a 3 arcsec search area around that position. This is useful for transients which may not have such accurate coordinates. | ||
| + | *'''Dither''': Select ''None'' as this is not commissioned on Lesedi+Mookodi. | ||
| + | |||
| + | ===Instrument Configuration: spectroscopy=== | ||
| + | [[File:OcsSpecInstConfig.png|600px|left|thumb|]] | ||
| + | <br clear=all> | ||
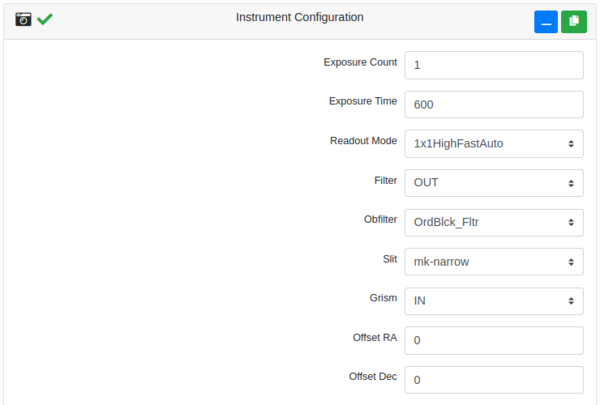
| + | *'''Exposure Count''': Enter the number of consecutive images to take with this instrument configuration and the specified Exposure Time. | ||
| + | *'''Readout Mode''': The options are 1x1HighFastAuto or 1x1HighSlowAuto with the format Binning_Gain_Readout_Shutter and the following definitions: | ||
| + | #''Binning'': 1x1 (platescale 0.59 arcsec/pix) | ||
| + | #''Gain'': High (for faint targets) | ||
| + | #''Readout rate'': Fast (5 MHz - read noise 13.6 electrons) or Slow (0.05 MHz read noise 3.3 electrons) | ||
| + | #''Shutter'': Auto triggers automatically between exposures. | ||
| + | *'''Filter''': Select ''OUT'' for spectroscopy. | ||
| + | *'''Obfilter''': Select ''OrdBlk_Fltr'' for spectroscopy. | ||
| + | *'''Slit''': There are two options for slit width - corresponding resolutions can be found on the [https://topswiki.saao.ac.za/index.php/Mookodi#Instrument_Description Mookodi wiki]: | ||
| + | #''mk-narrow'' (2 arcsec) | ||
| + | #''mk-wide'' (4 arcsec) | ||
| + | *'''Grism''': must be ''IN'' for spectroscopy. | ||
| + | *'''Offset RA/Dec''': this is not implemented so should be left blank. | ||
| + | |||
| + | ==Recipe 4: Imaging with non-sidereal tracking== | ||
| + | |||
| + | For imaging of non-sidereal objects we have to use spectroscopy mode, but with the slit and grism out of the beam. | ||
| + | |||
| + | ===Configuration: imaging with non-sidereal tracking=== | ||
| + | |||
| + | [[File:OcsConfigSpecImage.png|600px|left|thumb|]] | ||
| + | <br clear=all> | ||
| + | *'''Instrument Category''': SPECTRA | ||
| + | *'''Instrument''': 1M0a_Mookodi_Spec | ||
| + | *'''Guide Mode''': Off | ||
| + | *'''Type''': Choose ''Expose'' here. | ||
| + | *'''Acquire Mode''': The options are as follows, where AcN stands for "acquire nearest star" and "Acq" means to "acquire RA & Dec": | ||
| + | #''AcN:OFF&Acq:OFF'': this option simply points the telescope and starts the observation without making any pointing adjustments. | ||
| + | #''AcN:OFF&Acq:ON'': this option will centre the requested coordinates on the centre of the CCD. This should be used if the field is crowded and/or the target wouldn't be visible in a four second acquisition image. This is probably the best option here. | ||
| + | #''AcN:ON&Acq:ON'': this option first centres the specified coordinates on the centre of the CCD, then adjusts the pointing to recentre on the brightest star found within a 3 arcsec search area around that position. | ||
| + | *'''Dither''': Select ''None''. | ||
| + | |||
| + | ===Instrument Configuration: imaging with non-sidereal tracking=== | ||
| + | |||
| + | Setup the instrument configuration as per the section on either [[#Instrument Configuration: single filter imaging |single filter]] or [[#Instrument Configuration: multiple filter cycling |multiple filter]] imaging. | ||
| + | |||
| + | ===Target=== | ||
| + | |||
| + | '''Type''': ''Non-sidereal'' | ||
| + | |||
| + | The other fields available for non-sidereal targets are explained [[#Target |here]]. | ||
| + | |||
| + | [[File:OcsTargetNonsidereal.png|600px|left|thumb|]] | ||
| + | <br clear=all> | ||
| + | |||
| + | ==Generic recipe: Target, Constraints, Window== | ||
| + | |||
| + | ===Target=== | ||
| + | |||
| + | You can add one target per Configuration. | ||
| + | |||
| + | *'''Name''': Enter the target name. Any format is allowed by the form, but ideally it should be searchable in the data archive. | ||
| + | *'''Type''': Options are: | ||
| + | '''1.''' '''''Sidereal'''''<br /> | ||
| + | For sidereal objects, you will enter the target coordinates and epoch. The format for RA and Dec is flexible - you can enter sexagesimal with either space (HH MM SS.SS -DD MM SS.SS) or colon delimiters (HH:MM:SS.SS -DD:MM:SS.SS), or decimal degrees (ddd.ddddddd -dd.ddddddd). Whichever format you use is converted to the other by the form, so you can double check. The fields for proper motion and parallax aren't implemented, so leave them blank. | ||
| + | [[File:OcsTargetSidereal.png|600px|left|thumb|]] | ||
| + | <br clear=all> | ||
| + | |||
| + | '''2.''' '''''Non-sidereal'''''<br /> | ||
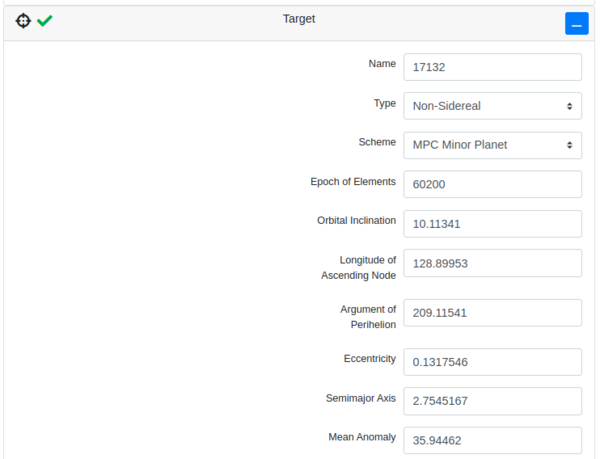
| + | If your target moves at a non-sidereal rate, specify it here to add orbital elements to enable your target’s coordinates to be determined at the time the observation starts. Note that if your Instrument Category is set to SPECTRA, this option will automatically activate non-sidereal tracking, but not for imaging. If your imaging target moves slowly enough (and your exposures are short enough) that you’re happy to have it move across a stationary field, select sidereal, otherwise see the section for [[#Recipe 4: Imaging with non-sidereal tracking |non-sidereal tracking in imaging mode]]. | ||
| + | |||
| + | The only option currently available for non-sidereal targets is for asteroids, and requests parameters in the following units/formats: | ||
| + | |||
| + | *'''Scheme''': the only option implemented at this stage is MPC Minor Planet. | ||
| + | *'''Epoch of the elements''' (format as a Modified Julian Date (MJD)) | ||
| + | *'''Orbital Inclination''' (in degrees) | ||
| + | *'''Longitude of Ascending Node''' (in degrees) | ||
| + | *'''Argument of Perihelion''' (in degrees) | ||
| + | *'''Eccentricity''' | ||
| + | *'''Semimajor Axis''' (in AU) | ||
| + | *'''Mean Anomaly''' (in degrees) | ||
| + | [[File:OcsTargetNonsidereal.png|600px|left|thumb|]] | ||
| + | <br clear=all> | ||
| + | |||
| + | ===Constraints=== | ||
| + | This section allows you to constrain the conditions in which your observation may be scheduled. Note that not all options have been implemented, and for those that are, being too restrictive with your selections reduces the scheduling opportunities for your observation. | ||
| + | *'''Maximum airmass''': The maximum allowable airmass of the target during the observation. The default is set to 1.6, which corresponds to an elevation of ~38.7 degrees. Lesedi’s tracking limit is 30 degrees elevation. If your observation needs to occur within a specific time window, ensure that you don’t set the maximum airmass so low as to prevent your observation from being scheduled in that window (i.e. target too low at that time). You can check this in the visibility plot generated in the next section. | ||
| + | *'''Minimum lunar separation''': The observation won’t be made when the moon is closer to the target than the angle entered here, regardless of lunar phase. The default is 30 degrees. | ||
| + | *'''Maximum lunar phase''': Enter a value between 0.0 (new moon) and 1.0 (full moon). This will prevent the observation from being scheduled when the moon is at a greater phase than specified. If you leave the box empty, it will default to 1.0. | ||
| + | *'''Maximum seeing''': this is not implemented - leave it blank. | ||
| + | *'''Minimum transparency''': this is not implemented - leave it blank. | ||
| + | |||
| + | [[File:OcsConstraints.png|600px|left|thumb|]] | ||
| + | <br clear=all> | ||
| + | |||
| + | ===Window=== | ||
| + | |||
| + | Here you will set the times within which your observation may be scheduled. The wider the window, the greater the scheduling opportunities, so it's advisable not to restrict it unnecessarily. You have the option to specify one window; multiple discrete windows; or multiple windows at a specified interval. For each window, (a maximum of) one observation will be scheduled. The dates need to be within the quadrimester to which your proposal has time allocated. Windows are specified with the following parameters: | ||
| + | |||
| + | *'''Start''': Select the earliest date and time (in UT) that the observation may start. These can be selected from a calendar, so you don't need to worry about the format. | ||
| + | *'''End''': Enter the end date and time (in UT) for the observation window. For an observation with no specific time constraints, the window could be as wide as the full season that the target is visible, to allow the greatest chance of it being observed. For a time-critical observation, the window should only cover the duration of the event, plus overheads. Once you have added a feasible end time, a visibility plot will appear. | ||
| + | |||
| + | Clicking on the green icon at the top of the window section will create additional windows for you to specify, which gives the scheduler discrete options as to when to make the observation. | ||
| + | |||
| + | *'''Cadence''': The options are: | ||
| + | #''None'' - if you only need a single observation. | ||
| + | |||
| + | [[File:OcsVisibilityCadenceNone.png|600px|left|thumb|In this example, one observation is requested with no repeats. The visibility plot shows all the possible times that the observation may be scheduled within the specified start and end times of the window.]] | ||
| + | <br clear=all> | ||
| + | |||
| + | #''Simple period'' - for multiple observations within the observing window, you can specify: | ||
| + | ''Period'': the time interval between repeat observations (in decimal hours). | ||
| + | ''Jitter'': the acceptable uncertainty in the period (in decimal hours), e.g. if the period is 48 hours and the jitter is 4 hours, a repeat observation may start between 44 and 52 hours after the previous one. The jitter must be long enough to include one full observation, including overheads. | ||
| + | |||
| + | Click “Generate Cadence” once these fields are filled and the visibility plot will update with all possible observing options within the specified window. | ||
| + | |||
| + | [[File:OcsVisibilityCadencePeriod.png|600px|left|thumb|If the observation is to be repeated at a given cadence, the plot will show the visibility traces separated by the specified period, in this example 48 hours. If a repeat is missed (e.g. due to weather), the next observation won't be scheduled until the next window - in this case after another 48±4 hours.]] | ||
| + | <br clear=all> | ||
| + | |||
| + | == Submitting the request == | ||
| + | |||
| + | [[File:OCSsubmit.png|140px|right|thumb|]] | ||
| + | Once you have completed all the sections, check that none of them has a red exclamation mark in the header, which would indicate a problem to be addressed before the request can be submitted. When all the details are correct, click the blue “Save Draft” button at the top right of the page, then the green “Submit Request” button. You will land on a page summarising your request and marking it as "Pending". If you spot any errors, click the cog button to cancel it. You can then return to the draft using the “Drafts” button at the top of the “Submit Observation” page; click the blue icon in the “Load” column beside the relevant request, edit accordingly, save again and resubmit. | ||
| + | |||
| + | You can return to a saved draft at any time to use as a template for a similar request. | ||
| + | |||
| + | == Troubleshooting == | ||
| + | |||
| + | 1. My proposal does not appear in the dropdown menu in the RequestGroup section. | ||
| + | * When telescope time is allocated, you need to [https://www.saao.ac.za/astronomers/accept-a-proposal accept the proposal] on the SAAO website. Instructions are [[#Getting started with the OCS|here]]. | ||
| + | * After registering on the OCS, you need to email your username to Ramotholo Sefako so that he can link your time allocation to your OCS account. | ||
Latest revision as of 12:38, 9 October 2024
Contents
- 1 Getting started with the OCS
- 2 Populating RequestGroup and Request
- 3 Recipe 1: Imaging with a single filter
- 4 Recipe 2: Imaging - multiple filter cycling
- 5 Recipe 3: Spectroscopy
- 6 Recipe 4: Imaging with non-sidereal tracking
- 7 Generic recipe: Target, Constraints, Window
- 8 Submitting the request
- 9 Troubleshooting
Getting started with the OCS
If you have been allocated queue-scheduled time on Lesedi, you will need to submit your requests to schedule observations via the SAAO Observatory Control System (OCS). Note that you need to have accepted the time allocation first, as instructed in the email informing you that your telescope time application was successful. This is done on the Accept a Proposal page on the SAAO website, where you will be prompted to log in with your Observer Portal credentials, then click the link again.
You will need to create an account on the OCS by submitting the registration form. You should then send an email to Ramotholo Sefako informing him of your username, so that he can link your telescope time to your OCS account.
Once your account has been activated, you can sign in at the OCS login page. It is advisable to go to your "Profile" by clicking on the person icon in the top-right-hand corner once you've logged in, and select your notification preferences at the bottom of the "Settings" page. If you tick both "Notifications enabled" and "Notifications on authored only", you will receive an email informing you each time a request you have submitted to the queue has been completed.
To submit an observation to the queue, click “Submit Observation” in the top left of the landing page, which will present you with the form to fill in. The first two components - RequestGroup and Request - are explained for all types of observations in the next section. Beyond that, there are recipes to follow for different types of observations.
Note that while we use the OCS developed by Las Cumbres Observatory (LCO), not all of the options available on the submission form have been implemented. If you are familiar with the LCO OCS, you will notice some differences in the functionality here.
Populating RequestGroup and Request
RequestGroup
The first section of the observation request form should look like the image below. Note that you can toggle between the form, the API view and a list of Drafts using the buttons in the panel along the top. You can save a draft any time using the blue button to the right, then load it from the Drafts tab at the top. In this way you can abandon a partially completed submission and return to complete it later. It is also particularly useful to save a completed form as a draft once you're happy with it, so that you can load it later to use as a template for future observation requests.
The options for a RequestGroup are as follows:
- Name: Give your request an identifier that is appropriate for your target/proposal/observation type. This is only for your purposes and need not take a specific format, but you should be able to recognise it in a list of all users’ request groups.
- Proposal: Your proposals that have time allocated to them will be available in the dropdown list. Select the appropriate proposal for your observation. If there is nothing in the list and you have accepted your proposal and registered as instructed above, contact Ramotholo Sefako.
- Type: The options are:
- Queue scheduled: this is a “normal” observation that can be made by the queue when it is feasible to do so, when the other parameters of your request are met.
- Time critical: if your observation is time sensitive (e.g. a transit, eclipse, etc.), you can specify a window within which it must be executed. Note that your proposal will need to have been approved as time critical, and have time critical hours allocated to it in order for this to work.
- Rapid response: this is for observations that need to be triggered as soon as possible, and will interrupt the scheduled queue (but will not interrupt an observation in progress). Again, you will need rapid response hours allocated to your proposal to successfully use this option.
- IPP Factor: Intra/Inter Proposal Priority factor. This will largely be of interest if you would like to prioritise different observations within your proposal; you would give a larger number to a higher priority observation. Values must be between 0.5 and 2. If you’re happy for all your observations to have equal priority, stick with the default value of 1.05. This is a very basic summary, the full explanation of IPP can be found here.
Request
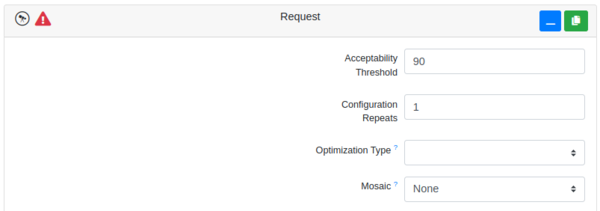
- Acceptability Threshold: Here you would specify the percentage of the request that would need to be done in order for you to accept it as having been completed. E.g. if you requested 10 exposures and only nine were taken, the default of 90% would accept this as complete. Had you specified 100%, the observation would be rescheduled. The time taken for the incomplete observation would be deducted from your allocation, as would any repeat observation that makes it to completion, so it'd be wise to avoid demanding 100% for completion unless you really need it.
- Configuration Repeats: This should be 1. (If you set it >1, it will still only schedule one iteration of the configuration.)
- Optimization Type: The options are:
- Time: favours scheduling the observation earlier in the observing window. Use this option as the default, especially as you can apply an airmass constraint in a later section. Definitely select this for time-critical observations.
- Airmass: will aim to observe the target at lower airmass. Note that specifying this results in a slightly lower chance of the request being observed if the queue is full.
- Mosaic: This has not been commissioned with Lesedi+Mookodi, so should be left as None.
Recipe 1: Imaging with a single filter
This recipe describes the Configuration and Instrument Configuration options for Mookodi's imaging mode -- follow this if you intend to do photometry using only one filter.
Configuration: single filter imaging
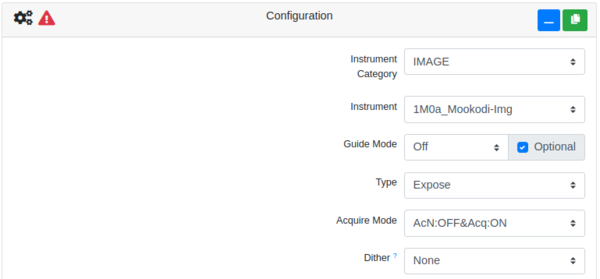
- Instrument Category: IMAGE
- Instrument: 1M0a_Mookodi-Img
- Guide Mode: For single short exposures (~60s) guiding isn’t necessary (Off), but for longer exposures, or multiple short exposures, it is advisable to use the autoguider (On). The "optional" tick box is not implemented so you can ignore it.
- Type: Choose Expose here. Other applicable options are Bias and Sky_flat, but these are taken automatically on a regular basis, so you will have access to them without observing them as part of your proposal.
- Acquire Mode: The options are as follows, where AcN stands for "acquire nearest star" and "Acq" means to "acquire RA & Dec":
- AcN:OFF&Acq:OFF: this option simply points the telescope and starts the observation without making any pointing adjustments. In other words, you are reliant on the telescope's pointing accuracy.
- AcN:OFF&Acq:ON: this option will centre the requested coordinates on the centre of the CCD. This is a good default option, but should definitely be used if (i) you have entered the coordinates of a space between stars, e.g. to fit both an target and a comparison star in the field; (ii) the field is crowded; and (iii) the target wouldn't be visible in a four second acquisition image.
- AcN:ON&Acq:ON: this option first centres the specified coordinates on the centre of the CCD, then adjusts the pointing to recentre on the brightest star found within a 3 arcsec search area around that position. This is useful for transients which may not have such accurate coordinates.
- Dither: Select None as this is not commissioned on Lesedi+Mookodi.
Instrument Configuration: single filter imaging
For a single filter, you will only need one instrument configuration.
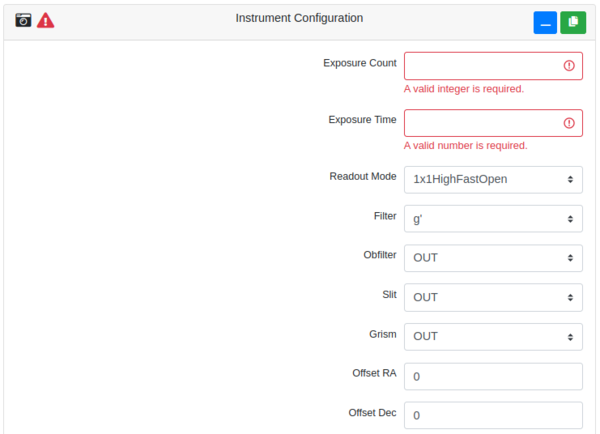
- Exposure Count: Enter the number of consecutive images to take with this instrument configuration and the specified Exposure Time.
- Readout Mode: The options are 1x1HighFastOpen, 1x1HighFastAuto, 1x1HighSlowAuto, 2x2HighFastAuto with the format Binning_Gain_Readout_Shutter and the following definitions:
- Binning: 1x1 (platescale 0.59 arcsec/pix) or 2x2 (1.18 arcsec/pix)
- Gain: High (for faint targets) or Low (bright targets)
- Readout rate: Fast (5 MHz - read noise 13.6 electrons) or Slow (0.05 MHz read noise 3.3 electrons)
- Shutter: Open must be selected for multiple exposures <60 seconds (time series will therefore typically be 1x1HighFastOpen). Otherwise Auto for longer exposures.
- Filter: Mookodi has two filter magazines, which the OCS calls Filter and Obfilter (below). There needs to be one filter – and only one filter – in the beam at any time, so you need to select one from one of the two magazines. In this box you can select an SDSS filter. If you want to use a clear filter, it is in the next field, so select OUT here.
- Obfilter: If you have selected an SDSS filter in the Filter option, select OUT here. Otherwise select Clear. Do not select OrdBlk_Fltr - this is for spectroscopy.
- Slit: must be OUT.
- Grism: must be OUT.
- Offset RA/Dec: this is not implemented so should be left blank.
Recipe 2: Imaging - multiple filter cycling
If you would like to cycle repeatedly through multiple filters, you can do that by specifying multiple Instrument Configurations (one per filter) and selecting the REPEAT_EXPOSE optio, as described below.
Configuration: multiple filter cycling
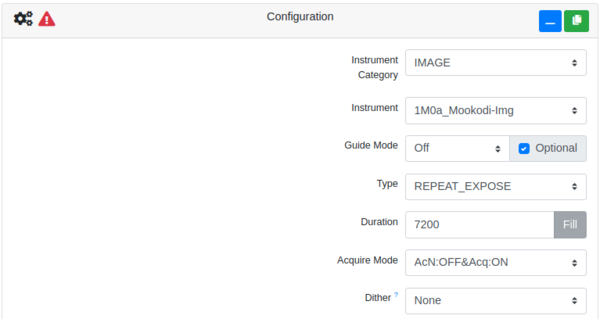
- Instrument Category: IMAGE
- Instrument: 1M0a_Mookodi-Img
- Guide Mode: For single short exposures (~60s) guiding isn’t necessary (Off), but for longer exposures, or multiple short exposures, it is advisable to use the autoguider (On). The "optional" tick box is not implemented so you can ignore it.
- Type: Choose REPEAT_EXPOSE and a box will appear requesting a duration. In this example, your instrument configurations (filters) will be repeated in turn for two hours. (Do not use REPEAT_EXPOSE to take multiple images in only one filter as it will add a short delay between exposures - for single filter runs rather specify the number of images in Instrument Configuration Exposure Count.)
Other applicable options are Bias and Sky_flat, but these are taken automatically on a regular basis, so you will have access to them without observing them as part of your proposal.
- Acquire Mode: The options are as follows, where AcN stands for "acquire nearest star" and "Acq" means to "acquire RA & Dec":
- AcN:OFF&Acq:OFF: this option simply points the telescope and starts the observation without making any pointing adjustments. In other words, you are reliant on the telescope's pointing accuracy.
- AcN:OFF&Acq:ON: this option will centre the requested coordinates on the centre of the CCD. This is a good default option, but should definitely be used if (i) you have entered the coordinates of a space between stars, e.g. to fit both an target and a comparison star in the field; (ii) the field is crowded; and (iii) the target wouldn't be visible in a four second acquisition image.
- AcN:ON&Acq:ON: this option first centres the specified coordinates on the centre of the CCD, then adjusts the pointing to recentre on the brightest star found within a 3 arcsec search area around that position. This is useful for transients which may not have such accurate coordinates.
- Dither: Select None as this is not commissioned on Lesedi+Mookodi.
Instrument Configuration: multiple filter cycling
For a multiple filters, you will need one instrument configuration per required filter, then use the REPEAT_EXPOSE function to cycle through those filters in turn.
- Exposure Count: Enter 1 here to take one exposure in each filter before moving on to the next filter.
- Readout Mode: The options are 1x1HighFastOpen, 1x1HighFastAuto, 1x1HighSlowAuto, 2x2HighFastAuto with the format Binning_Gain_Readout_Shutter and the following definitions:
- Binning: 1x1 (platescale 0.59 arcsec/pix) or 2x2 (1.18 arcsec/pix)
- Gain: High (for faint targets) or Low (bright targets)
- Readout rate: Fast (5 MHz - read noise 13.6 electrons) or Slow (0.05 MHz read noise 3.3 electrons)
- Shutter: Open must be selected for multiple exposures <60 seconds (time series will therefore typically be 1x1HighFastOpen). Otherwise Auto for longer exposures.
- Filter: Mookodi has two filter magazines, which the OCS calls Filter and Obfilter (below). There needs to be one filter – and only one filter – in the beam at any time, so you need to select one from one of the two magazines. In this box you can select an SDSS filter. If you want to use a clear filter, it is in the next field, so select OUT here.
- Obfilter: If you have selected an SDSS filter in the Filter option, select OUT here. Otherwise select Clear. Do not select OrdBlk_Fltr - this is for spectroscopy.
- Slit: must be OUT.
- Grism: must be OUT.
- Offset RA/Dec: this is not implemented so should be left blank.
Assuming the only change you wish to make between exposures is the filter, it's easiest to complete one Instrument Configuration, then click on the green "copy" icon in the section title bar to add another pre-populated Instrument Configuration for as many filters as you need, then edit the Filter or Obfilter field as appropriate. This example will continuously cycle 20s in g', then 25s in r' for 7200s.
Recipe 3: Spectroscopy
Being an imaging spectrograph, Mookodi has two different Configurations in the OCS. Instrument Category SPECTRA makes specific spectroscopic functions available.
Configuration: spectroscopy
- Instrument Category: SPECTRA
- Instrument: 1M0a_Mookodi_Spec
- Guide Mode: Always select On for spectroscopy to prevent the target from drifting off the slit.
- Type: Choose Expose here. An arc lamp spectrum is automatically taken after each science spectrum, so there’s no need to make a configuration using Arc_lamp. Other applicable options are Bias, Sky_flat and Standard, but these are taken automatically on a regular basis, so you will have access to them without observing them as part of your proposal.
- Acquire Mode: The options are as follows, where AcN stands for "acquire nearest star" and "Acq" means to "acquire RA & Dec":
- AcN:OFF&Acq:OFF: do not use this for spectroscopy, the target will not land on the slit.
- AcN:OFF&Acq:ON: this option will centre the requested coordinates on the centre of the CCD. This should be used if the field is crowded and/or the target wouldn't be visible in a four second acquisition image.
- AcN:ON&Acq:ON: this option first centres the specified coordinates on the centre of the CCD, then adjusts the pointing to recentre on the brightest star found within a 3 arcsec search area around that position. This is useful for transients which may not have such accurate coordinates.
- Dither: Select None as this is not commissioned on Lesedi+Mookodi.
Instrument Configuration: spectroscopy
- Exposure Count: Enter the number of consecutive images to take with this instrument configuration and the specified Exposure Time.
- Readout Mode: The options are 1x1HighFastAuto or 1x1HighSlowAuto with the format Binning_Gain_Readout_Shutter and the following definitions:
- Binning: 1x1 (platescale 0.59 arcsec/pix)
- Gain: High (for faint targets)
- Readout rate: Fast (5 MHz - read noise 13.6 electrons) or Slow (0.05 MHz read noise 3.3 electrons)
- Shutter: Auto triggers automatically between exposures.
- Filter: Select OUT for spectroscopy.
- Obfilter: Select OrdBlk_Fltr for spectroscopy.
- Slit: There are two options for slit width - corresponding resolutions can be found on the Mookodi wiki:
- mk-narrow (2 arcsec)
- mk-wide (4 arcsec)
- Grism: must be IN for spectroscopy.
- Offset RA/Dec: this is not implemented so should be left blank.
Recipe 4: Imaging with non-sidereal tracking
For imaging of non-sidereal objects we have to use spectroscopy mode, but with the slit and grism out of the beam.
Configuration: imaging with non-sidereal tracking
- Instrument Category: SPECTRA
- Instrument: 1M0a_Mookodi_Spec
- Guide Mode: Off
- Type: Choose Expose here.
- Acquire Mode: The options are as follows, where AcN stands for "acquire nearest star" and "Acq" means to "acquire RA & Dec":
- AcN:OFF&Acq:OFF: this option simply points the telescope and starts the observation without making any pointing adjustments.
- AcN:OFF&Acq:ON: this option will centre the requested coordinates on the centre of the CCD. This should be used if the field is crowded and/or the target wouldn't be visible in a four second acquisition image. This is probably the best option here.
- AcN:ON&Acq:ON: this option first centres the specified coordinates on the centre of the CCD, then adjusts the pointing to recentre on the brightest star found within a 3 arcsec search area around that position.
- Dither: Select None.
Instrument Configuration: imaging with non-sidereal tracking
Setup the instrument configuration as per the section on either single filter or multiple filter imaging.
Target
Type: Non-sidereal
The other fields available for non-sidereal targets are explained here.
Generic recipe: Target, Constraints, Window
Target
You can add one target per Configuration.
- Name: Enter the target name. Any format is allowed by the form, but ideally it should be searchable in the data archive.
- Type: Options are:
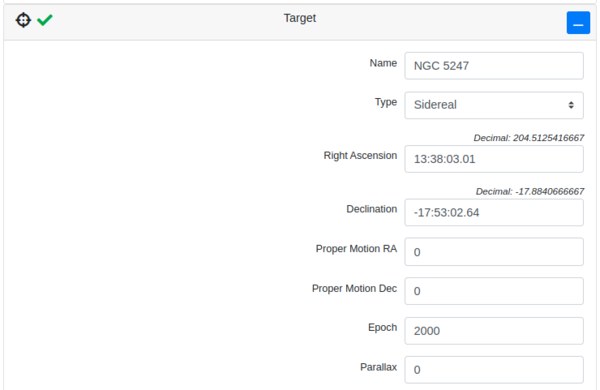
1. Sidereal
For sidereal objects, you will enter the target coordinates and epoch. The format for RA and Dec is flexible - you can enter sexagesimal with either space (HH MM SS.SS -DD MM SS.SS) or colon delimiters (HH:MM:SS.SS -DD:MM:SS.SS), or decimal degrees (ddd.ddddddd -dd.ddddddd). Whichever format you use is converted to the other by the form, so you can double check. The fields for proper motion and parallax aren't implemented, so leave them blank.
2. Non-sidereal
If your target moves at a non-sidereal rate, specify it here to add orbital elements to enable your target’s coordinates to be determined at the time the observation starts. Note that if your Instrument Category is set to SPECTRA, this option will automatically activate non-sidereal tracking, but not for imaging. If your imaging target moves slowly enough (and your exposures are short enough) that you’re happy to have it move across a stationary field, select sidereal, otherwise see the section for non-sidereal tracking in imaging mode.
The only option currently available for non-sidereal targets is for asteroids, and requests parameters in the following units/formats:
- Scheme: the only option implemented at this stage is MPC Minor Planet.
- Epoch of the elements (format as a Modified Julian Date (MJD))
- Orbital Inclination (in degrees)
- Longitude of Ascending Node (in degrees)
- Argument of Perihelion (in degrees)
- Eccentricity
- Semimajor Axis (in AU)
- Mean Anomaly (in degrees)
Constraints
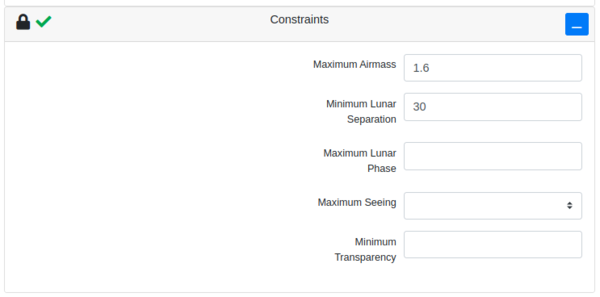
This section allows you to constrain the conditions in which your observation may be scheduled. Note that not all options have been implemented, and for those that are, being too restrictive with your selections reduces the scheduling opportunities for your observation.
- Maximum airmass: The maximum allowable airmass of the target during the observation. The default is set to 1.6, which corresponds to an elevation of ~38.7 degrees. Lesedi’s tracking limit is 30 degrees elevation. If your observation needs to occur within a specific time window, ensure that you don’t set the maximum airmass so low as to prevent your observation from being scheduled in that window (i.e. target too low at that time). You can check this in the visibility plot generated in the next section.
- Minimum lunar separation: The observation won’t be made when the moon is closer to the target than the angle entered here, regardless of lunar phase. The default is 30 degrees.
- Maximum lunar phase: Enter a value between 0.0 (new moon) and 1.0 (full moon). This will prevent the observation from being scheduled when the moon is at a greater phase than specified. If you leave the box empty, it will default to 1.0.
- Maximum seeing: this is not implemented - leave it blank.
- Minimum transparency: this is not implemented - leave it blank.
Window
Here you will set the times within which your observation may be scheduled. The wider the window, the greater the scheduling opportunities, so it's advisable not to restrict it unnecessarily. You have the option to specify one window; multiple discrete windows; or multiple windows at a specified interval. For each window, (a maximum of) one observation will be scheduled. The dates need to be within the quadrimester to which your proposal has time allocated. Windows are specified with the following parameters:
- Start: Select the earliest date and time (in UT) that the observation may start. These can be selected from a calendar, so you don't need to worry about the format.
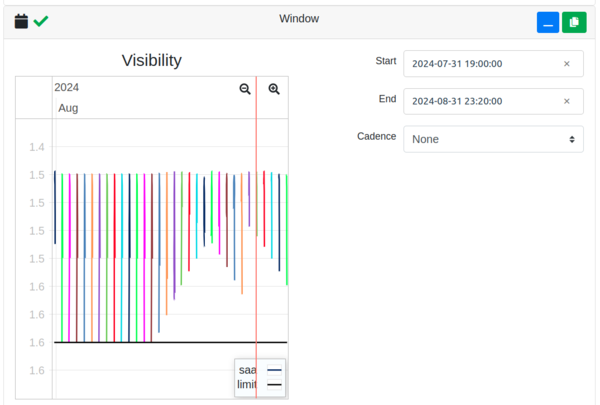
- End: Enter the end date and time (in UT) for the observation window. For an observation with no specific time constraints, the window could be as wide as the full season that the target is visible, to allow the greatest chance of it being observed. For a time-critical observation, the window should only cover the duration of the event, plus overheads. Once you have added a feasible end time, a visibility plot will appear.
Clicking on the green icon at the top of the window section will create additional windows for you to specify, which gives the scheduler discrete options as to when to make the observation.
- Cadence: The options are:
- None - if you only need a single observation.
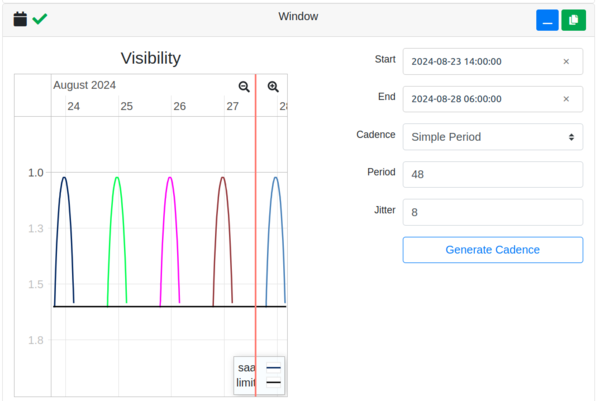
- Simple period - for multiple observations within the observing window, you can specify:
Period: the time interval between repeat observations (in decimal hours). Jitter: the acceptable uncertainty in the period (in decimal hours), e.g. if the period is 48 hours and the jitter is 4 hours, a repeat observation may start between 44 and 52 hours after the previous one. The jitter must be long enough to include one full observation, including overheads.
Click “Generate Cadence” once these fields are filled and the visibility plot will update with all possible observing options within the specified window.
Submitting the request
Once you have completed all the sections, check that none of them has a red exclamation mark in the header, which would indicate a problem to be addressed before the request can be submitted. When all the details are correct, click the blue “Save Draft” button at the top right of the page, then the green “Submit Request” button. You will land on a page summarising your request and marking it as "Pending". If you spot any errors, click the cog button to cancel it. You can then return to the draft using the “Drafts” button at the top of the “Submit Observation” page; click the blue icon in the “Load” column beside the relevant request, edit accordingly, save again and resubmit.
You can return to a saved draft at any time to use as a template for a similar request.
Troubleshooting
1. My proposal does not appear in the dropdown menu in the RequestGroup section.
- When telescope time is allocated, you need to accept the proposal on the SAAO website. Instructions are here.
- After registering on the OCS, you need to email your username to Ramotholo Sefako so that he can link your time allocation to your OCS account.


